Style & Trends
What Is an Ear Constellation? A Beginner’s Guide to Curated Ear Stacking
If you have ever saved a photo of an ear studded with tiny gold pieces and wondered how anyone pulled that off, you are looking at a curated ear. The arrangement has a name in English: an ear constellation. This guide walks through what the term means, how the anatomy of your ear shapes the layout, and the three styling rules that keep a multi-piercing look balanced instead of cluttered.

Ear Constellation
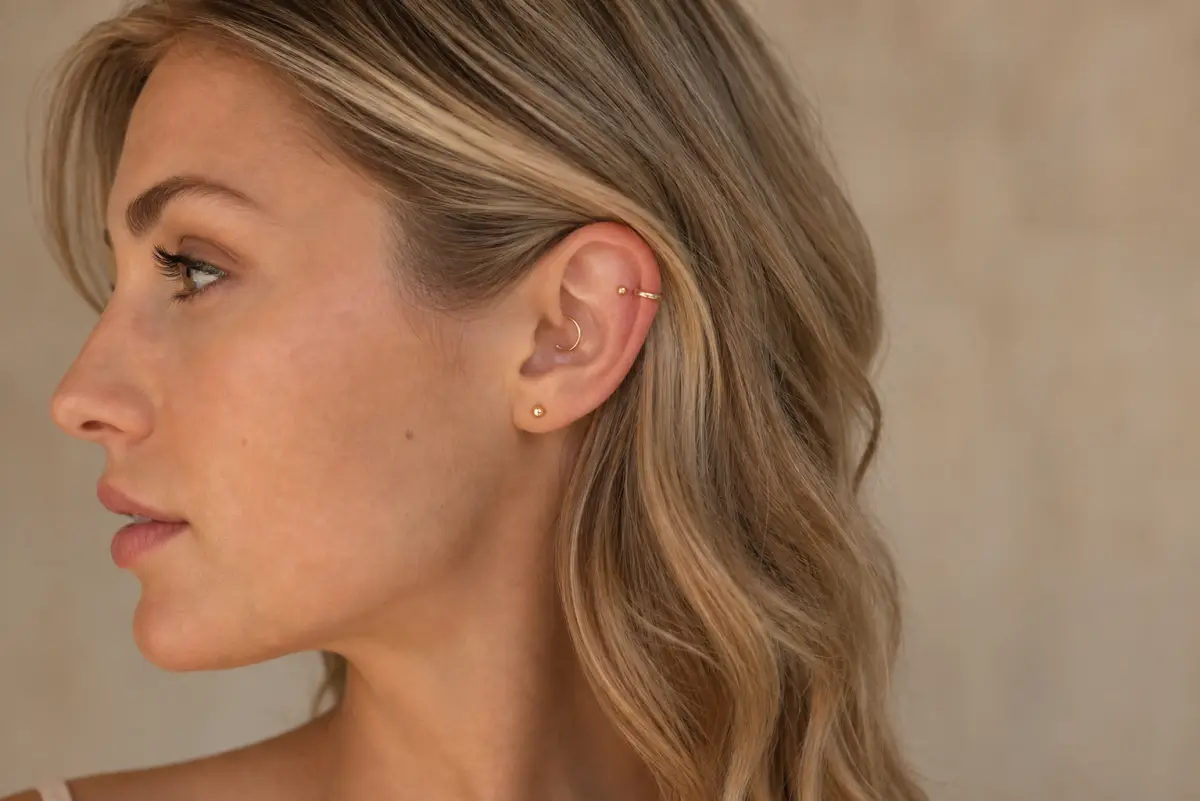
An ear constellation is a curated arrangement of multiple ear piercings styled as one composition, with each piece placed according to the natural contours of the ear and spaced with deliberate gaps so the set reads as a constellation rather than a collection of holes.
The idea grew out of the curated ear trend that jewelry brands and piercing studios in the US popularized over the past several years. Instead of adding piercings one at a time with no plan, you design the whole ear first. The lobe carries the hero piece, the cartilage lines up a supporting cast, and the spaces between pieces matter as much as the jewelry itself.
Three ingredients make an arrangement read as a constellation. The points follow a visible path along the ear’s curve. The pieces have a clear hierarchy, one focal point the eye lands on first. And the gaps stay wide enough that each piece stands on its own. Skip any of the three, and the look turns into a pile of studs.
Learn the Terrain of Your Ear Before You Plan
Piercings are not stickers. Each part of the ear heals at its own pace, carries different weight, and shows in different angles. A layout that works beautifully on one ear can look cramped on another. Know the zones first, then design.
| Placement | Healing time | What it is good for |
|---|---|---|
| Earlobe (lobe) | 6-8 weeks | The only soft tissue; heals fastest, can hold slightly heavier or dangle pieces. |
| Inner bowl (conch) | 3-9 months | Large surface, great hero spot for a flat-back stud or a small hoop. |
| Outer rim (helix) | 3-9 months | Runs along the outer curve; ideal for a line of studs that traces the edge. |
| Ear entrance (tragus) | 3-9 months | Small cartilage nub by the ear canal; best for a tiny stud, nearly invisible from behind. |
| Deep folds (daith / rook) | 3-9 months | Hidden inner folds; suits a delicate ring, a quiet accent that only shows at certain angles. |

Healing times are industry-standard ranges, not promises. Cartilage is far more particular than the lobe. Sleeping on the piercing, catching it on a sweater, or switching to heavy jewelry too early can slow healing for months and, in the worst case, force you to take the piece out and start over.
The beginner rule lives in that table. Start with the lobe. Wear two lobe studs for a full two months and confirm your ears tolerate the jewelry well before touching cartilage. A cartilage piercing commits you to three or more months of care, so do not book three cartilage piercings on one ear in a single sitting.
Three Rules That Make an Ear Stack Look Designed
Every working constellation follows the same trio of principles. Sizes graduate. The front stays light. Solids, hoops, and cuffs alternate. Each rule solves a specific problem, and together they do the heavy lifting that makes a random set of piercings look intentional.
Rule 1: Graduate the Sizes
A row of identical studs looks like a checklist, not a constellation. Constellations need a main star, and the main star sits low while the supporting pieces float upward. That creates an instant visual center of gravity.
The standard placement puts the hero piece on the lobe or the conch, the two areas big enough and visible enough to carry something with presence, such as a 6mm-plus stud or a slim hoop. From there, sizes step down toward the tip of the ear, ending at a 2mm mini stud at the tragus or the upper helix. The shrinking line softly traces the outline of the ear without any extra effort.
You can invert the direction too, putting the largest piece at the conch and finishing the lobe with a pair of small studs. Both directions work. Pick the one that makes the visual weight land where you want the eye to go first.
Rule 2: Keep the Front Light
Ears have a front and a side. The front is what people catch while looking at your face, the tragus, the front bowl, and the front of the lobe. The side is the outer rim and everything that wraps toward the back of the head.
Keep the front zone restrained. Facial attention is finite, and an ear that competes with your eyes is an ear doing the wrong job. A single mini stud at the tragus plus a small piece on the lobe is already a complete statement from the front.
Save the play for the side. The back rim, the inner bowl, and the upper helix barely register until someone turns their head, so they can carry larger hoops, geometric cuffs, and pieces that peek out from behind. Quiet in front, expressive on the side, and the ear only becomes interesting when the person turns.
Rule 3: Alternate Solids, Hoops, and Cuffs
Ear jewelry comes in three visual textures. Solid studs and flat backs read as points. Hoops read as negative space, the hole in the middle becoming part of the design. Cuffs wrap around the edge like a ring around the ear, adding a sculptural outline.
Alternating the three creates rhythm. A solid lobe stud, a thin hoop in the conch, a cuff on the upper rim, the sequence point, circle, arc, and the ear gains depth without any piece shouting. Hoops and cuffs share a practical bonus: they need no new piercing. Existing holes or even unpierced cartilage can wear them, which makes them the cheapest way to expand a constellation.

Breathing room belongs in every layout. Leave at least the width of one piece between neighbors so each star has its own space, and cap the front-facing view at three pieces. Three is not a hard law, it is the density at which most faces look best. Past that, stacking becomes dumping.
How to Build Your Constellation, Step by Step
Theory condenses into five moves. Work through them in order, and give each piercing the healing time it asks for before adding the next.
- Choose the hero piece. Decide on the one largest, most intentional piece for this ear, usually a lobe or conch stud, and wear it first.
- Let it settle. Earlobes need at least two months, cartilage at least three. Keep the area dry, leave the jewelry in, and use flat-back studs instead of hooks that catch on hair.
- Add the second star. Place it in a different direction from the hero, one size smaller, so the ear gains its first obvious grading step.
- Space out the sessions. Leave a full healing cycle between piercings. Ears do not appreciate back-to-back work.
- Step back and edit. Look in the mirror from arm’s length, not close up. Wherever the ear reads crowded, remove one piece. Subtraction is as important as addition.
Plan for six months to a year. A curated ear is a slow process by design. Each new star only lands after the previous one is fully healed, and that pacing is exactly what keeps the final arrangement safe and clean.
Frequently Asked Questions
What is a curated ear or ear constellation?
A curated ear is a planned layout of multiple piercings styled as one composition, typically two to six pieces arranged along the ear’s natural curves. An ear constellation is the same idea described with the constellation metaphor, a layout where the jewelry reads like stars connected by the ear’s silhouette.
How many piercings do you need for an ear constellation?
There is no minimum. One pair of lobe studs plus a cuff and a hoop is already a complete composition. Most first constellations land at four to six pieces. Start small and add over time rather than filling the ear in one session.
How long do cartilage piercings take to heal compared with lobe piercings?
Lobes heal in six to eight weeks. Cartilage piercings such as helix, conch, tragus, daith, and rook take three to nine months, with full stability often taking up to a year. Cartilage has poor blood flow, so it recovers slowly, and heavy or hook-style jewelry during healing can set the calendar back.
Can you wear ear cuffs without a piercing?
Yes. Ear cuffs clip onto the rim of the ear with spring tension and need no piercing at all. They are removable and repositionable, which makes them the zero-commitment way to test a constellation before, or between, actual piercings.
Can you mix hoop earrings and ear cuffs?
Yes, and the combination is one of the strongest tools in ear stacking. A cuff hugs the rim while a hoop occupies open space, two different textures that alternate cleanly. For hair that snags, choose closed or small hoops, keep drops at or above the lobe line, and take everything off before sleep.
Do both ears have to match?
No. Ear constellations are designed per ear. The two sides can be completely different and still look coordinated, provided each ear follows the size and spacing rules on its own. That asymmetry is part of why the trend caught on compared with traditional matching pairs.
Can you get multiple piercings in one sitting?
The piercing itself is a quick moment and the pain is manageable. The commitment is the aftercare. Avoid more than two piercings per session, especially on the same ear, because simultaneous swelling makes healing harder. Batch in rounds and let each round graduate before planning the next.
Related reading
The Bottom Line
An ear constellation is a slow style by design. It does not demand one perfect session, it grows with your healing schedule, one star at a time. Plan the layout, respect the gaps, and let the jewelry arrive at its own pace, and the small universe on your ear will outlast any single statement piece.
Build your constellation piece by piece
Wearlumi demi-fine jewelry, designed for stacking and everyday wear